[Ethers Js - 1] Getting Started, prerequisites and installations.
![[Ethers Js - 1] Getting Started, prerequisites and installations.](https://images.unsplash.com/photo-1632594737623-bea601083890?crop=entropy&cs=tinysrgb&fit=max&fm=jpg&ixid=MnwxMTc3M3wwfDF8c2VhcmNofDd8fHN0YXJ0fGVufDB8fHx8MTY2NzYwNzA4Mg&ixlib=rb-4.0.3&q=80&w=960)
Before we can have fun with on-chain data, have big-brain insights from it, and act on the alpha, we need to learn the basics of how to easily connect, and interact with the Ethereum blockchain using Ethers JS. The first few lessons would cover the basics before we do fun shit.
Ethers JS is not the only way to connect and interact with the Ethereum blockchain, however it is one of the most commonly used tools. There are multiple other options like web3.js and web.py ( for people who love Python ). We will stick to Ethers in this series.
Moreover, Ethers Js is not confined to the Ethereum mainnet and its testnets ( Goerli, Rinkeby, Kovan ..). You can use ethers to interact with any EVM compatible L1 and L2 chains and their respective testnets (e.g. FTM, Avalanche, Polygon, Harmony, Celo, Optimism, Arbitrum ...). We will connect and work with various chains throughout this series.
Prerequisites
I will not teach how to code from scratch here, that is out of scope for these tutorials. I will assume that you have some prior knowledge of basic javascript and have used npm packages before. You do not have to be an expert at it.
If you are starting out, I suggest go take a introductory javaScript class before returning here. FreeCodeCamp is an excellent free resource to get started.
Nor will I go over the basics of Ethereum, gas, and other concepts like how to use Metamask. You should already know those things before venturing here. In fact, you will appreciate this fully if you are already a DEFI/NFT degen, as we will automate a lot of your degen activities.
If you are new to the world of programming or crypto, don't worry - These things are not hard to follow. We will make a super-powered crypto-native out of you soon enough.
Your Development Environment
Step 1
You should have node and npm installed in your machine. If you do not have these installed, please follow the steps here:
https://docs.npmjs.com/downloading-and-installing-node-js-and-npm
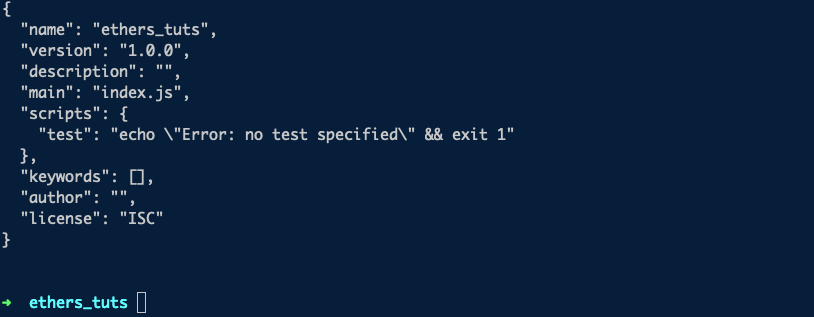
Once you have these installed, you can check the installation with the commands
node -v
npm -v
These are the versions I am using on my mac OS, please try to use the same version to avoid complications later.
If you get the version numbers back, you are ready for the next step.
Note: There is more than one way to skin the cat, you can use yarn instead of npm if you like, just change the npm commands accordingly. I am picking one and sticking to it.
Step 2
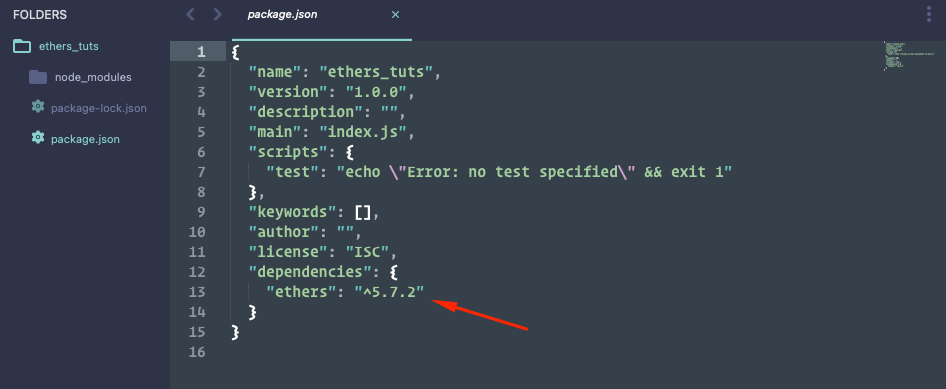
Now, let's start a working directory for our ethers playground with the commands mkdir ethers_tuts && cd ethers_tuts
Now that we are inside our playground folder, we can initiate package.json with
npm init -y
And install ethers with:
npm i ethers
Your package,json file should now show ethers as a dependency:
Step 3
Now, let's create a play.js file in the ethers_tuts folder and add one line of code -
console.log("wen token sers?")We can run the following command in our console to run the script in play.js ( which is just one line of code for now)
node play
If you get something like this, you are good to go!

There you have it, we have a basic playground setup for our next few lessons.
We will keep adding to this as we go. See you in the next lesson!